This Cheesy Stuffed Pasta Nests balances hearty flavor with a straightforward process, so you get a reliable, delicious result every time.
Cheesy Stuffed Pasta Nests captures the essence of meals|chicken while staying approachable for everyday cooking. The method focuses on maximizing flavor with minimal steps, using common pantry items and fresh ingredients. From the first bite you’ll notice a balance of texture and taste that feels both familiar and exciting. To build depth, we combine proper seasoning with simple techniques: gentle heat for aromatics, accurate measurements, and attention to doneness. Small details—like resting time or layering ingredients—make a noticeable difference in the final dish. This recipe is designed to be flexible. You can swap in seasonal produce, adjust spices to match your preferences, or adapt the base to suit dietary needs. The goal is to keep the spirit of the dish while letting you tailor it to your kitchen. Serving ideas are wide open: pair with a crisp salad, roasted vegetables, warm bread, or your favorite grains. Leftovers store well and often taste even better the next day as flavors settle. That makes the recipe suitable for meal prep and busy schedules. For best results, read the steps once before you start, assemble ingredients, and cook with confidence. Taste as you go, and don’t be afraid to adjust seasoning. With these principles, Cheesy Stuffed Pasta Nests becomes a reliable addition to your rotation—crowd-pleasing, practical, and full of flavor.
INGREDIENTS
200g tagliatelle or fettuccine nests (about 8-10 nests)
2 tablespoons olive oil
1 small onion, finely chopped
2 cloves garlic, minced
1 small red bell pepper, finely diced
200g ground chicken or beef (optional, for a meaty version)
1 ½ cups tomato sauce or marinara sauce
½ teaspoon salt
½ teaspoon black pepper
½ teaspoon dried oregano
½ teaspoon paprika
½ teaspoon chili flakes (optional)
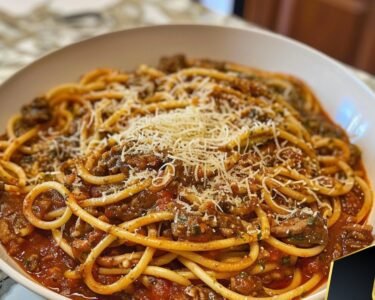
1 cup mozzarella cheese, shredded
¼ cup Parmesan cheese, grated
2 tablespoons fresh parsley, chopped
PREPARATION STEPS
Prepare the Pasta Nests:
Bring a pot of salted water to a boil.
Cook the pasta nests for about 2 minutes less than the package instructions (since they will continue cooking later).
Drain and set aside.
Make the Sauce:
In a pan, heat olive oil over medium heat.
Add chopped onion and garlic, sauté until fragrant.
Add diced red bell pepper and cook for 2 minutes.
If using, add ground chicken or beef and cook until browned.
Stir in tomato sauce, salt, pepper, oregano, paprika, and chili flakes.
Simmer for 5-7 minutes until slightly thickened.
Assemble the Pasta Nests:
In a large oven-safe pan or baking dish, arrange the pasta nests in a single layer.
Using a spoon, fill each nest with the prepared sauce.
Sprinkle mozzarella cheese and Parmesan cheese over the top.
Cook to Perfection:
Cover with a lid or foil and bake at 375°F (190°C) for 15 minutes (or cook on the stovetop with a lid for 10 minutes).
Remove the lid, and bake or broil for another 5 minutes until the cheese is melted and bubbly.
Serve & Enjoy:
Garnish with fresh parsley and serve warm!
Nutritional Information:
Prep Time: 10 minutes | Cooking Time: 25 minutes | Total Time: 35 minutes
Calories: ~350 kcal per serving | Servings: 4
These cheesy stuffed pasta nests are perfect for a cozy dinner or a fun dish to impress your guests!
ORIGIN
Home-style cooking inspired by classic flavors and modern, reliable methods.
META INFOS
Prep: 15 min | Cook: 20 min | Total: 35 min | Servings: 4 | Calories: ~350 kcal | Difficulty: Easy
BENEFITS
Balanced flavor with approachable prep. Nutrition-friendly options and make-ahead friendly for busy schedules.
OCCASIONS
Weeknight dinners; Family gatherings; Potlucks; Holidays; Picnics; Meal prep
VARIATIONS
Swap seasonal produce; Adjust spices; Offer gluten-free or low-carb options where suitable; Try alternative proteins.
PAIRINGS
Green salad; Roasted vegetables; Rice or bread
STORAGE
Refrigerate in airtight container 2–4 days; freeze up to 2 months. Reheat gently to preserve texture.
TIPS
Measure accurately; Preheat pans/oven; Avoid overcooking; Taste and adjust seasoning; Rest before slicing when needed.